You are using an out of date browser. It may not display this or other websites correctly.
You should upgrade or use an alternative browser.
You should upgrade or use an alternative browser.
Cosmo's 3D Printer Project Feed
- Thread starter Cosmo
- Start date
-
- Tags
- delorean model twitch
LOL! It was probably the other set of wheel wells. Those take a MASSIVE amount of supports and so are basically surrounded by junk that needs to be pried off. Doesn't look like anything other than a skyscraper when it's printing.I saw something printing a couple of days ago and thought "that can't be part of the DeLorean!"
I could lie them down so they don't use so much material, but the taller orientation hides the layer lines and you get a smoother overall finish. I'll have to get a good camera set up for painting this.
Dizzie
Temporal Navigator
Just watched you take them off the printer in a recent twitch video. Scared the heck out of me when you started ripping them apart by hand, but you seem to know what you're doing ?LOL! It was probably the other set of wheel wells. Those take a MASSIVE amount of supports and so are basically surrounded by junk that needs to be pried off. Doesn't look like anything other than a skyscraper when it's printing.
I could lie them down so they don't use so much material, but the taller orientation hides the layer lines and you get a smoother overall finish. I'll have to get a good camera set up for painting this.
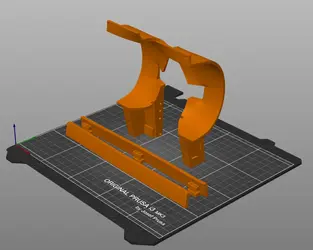
This finally finished printing last night! Here's a couple photos showing the mudguard pieces with and without all the support material.New print! Final pieces of the static suspension/frame. After this we'll try to get it partially assembled to see how things fit, then experiment with some painting.
[ATTACH type=full" alt="1649625629603.png]1698[/ATTACH]
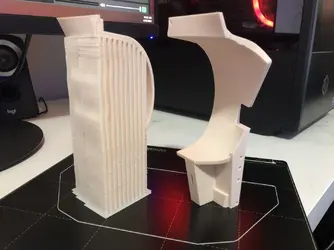
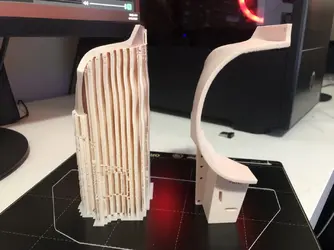
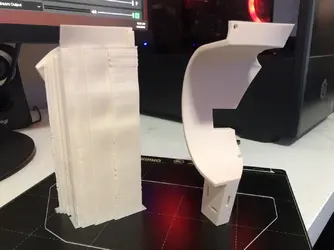
They came out BEAUTIFULLY and these will be very easy to post-process and get painted. Very excited... Good things take time. We are considering a second printer.
Here's the support material from the one mudguard:
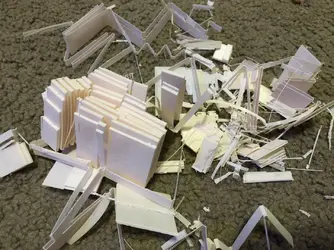
On the floor, of course.
Next up is a little ditty I like to call under_hood.stl:
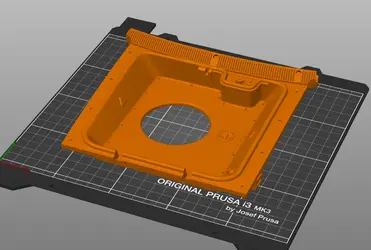
The supports on this one are pretty minimal:
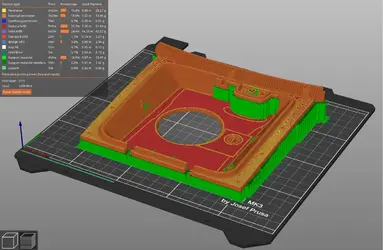
If you look at the curved edge where the bottom of the windshield meets the curve of the frame, you'll see there's going to be some visible layer lines.

These would have been pretty visible if we printed the mudguards lying down; more fidelity vertically than horizontally.

The supports on this one are pretty minimal:

If you look at the curved edge where the bottom of the windshield meets the curve of the frame, you'll see there's going to be some visible layer lines.

These would have been pretty visible if we printed the mudguards lying down; more fidelity vertically than horizontally.
Last edited by a moderator:
Part IV will be delayed a few more days - I had to order a pair of flush cutters so I could snip the 2.75mm filament to where it's supposed to be. Gotta do that before I can figure out which assemblies get painted as one piece and which ones do not.
In the meantime, I figured I'd go for glory and print what I think is the biggest piece in this project:
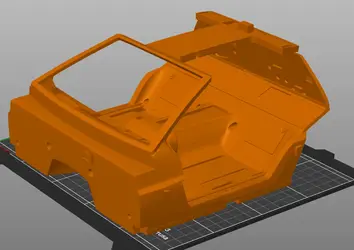
This bad boy will take 4 days... I am exceeding the boundaries of the print plate on this one, but the first layer is going down okay so far. If it makes it through the next 12 hours, it should be ok.
In the meantime, I figured I'd go for glory and print what I think is the biggest piece in this project:

This bad boy will take 4 days... I am exceeding the boundaries of the print plate on this one, but the first layer is going down okay so far. If it makes it through the next 12 hours, it should be ok.
Num7
Staff member
What part is this right now? Last time I looked an hour ago, I couldn't tell.57 hours remain...
Still this one:What part is this right now? Last time I looked an hour ago, I couldn't tell.
View attachment 1871
The zig-zaggy bits are supports that'll hold up things above it, so all this:
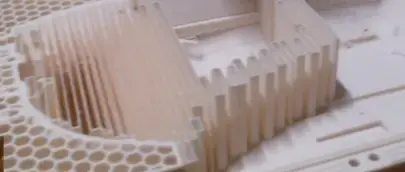
Is going to be holding up the windshield top:
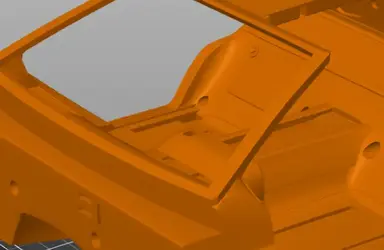
Hard to see it early unless you have 3D Extrusion Hypnosis Syndrome and find yourself staring at it for an unreasonable amount of time, even when you were on your way to do something else.
Okay, now that I've had time to absorb what happened today and the wailing with gnashing of teeth has subsided, here's what's up:
[*]Most of a spool of plastic in the bin
[*]After the failed print, I decided to change the nozzle because it was over 1000 hours in and I was starting to see some boogering/clogging
[*]Like a good 3D printer owner, I reviewed tutorials and documentation on how to do this
[*]My hotend has seen some use, so it was only when I got the old nozzle off that I realized the extra nozzles I have are too tall and don't have the right diameter (.4mm)
[*]Attempting to reattach the old nozzle revealed that the heating block has something loose in it somewhere further up the assembly.
I have to put the printer away until I can sit down and disassemble the hotend to figure out what's what. It's a mechanical issue I should be able to fix, it's just in a dirty old hotend that I don't have bandwidth to bank on messing with it forever only to find something unfixable (or anything else that would further delay the stuff I want to do with you all). I beat the shit out of this Prusa i3 Mk3 over the years, and she'll be resurrected eventually, just not today.
That's not the end of the project. We were budgeting for a new printer later in the year, but I guess we'll pull the trigger now so we can ascend to the DMC heavens and attain the Mark of McFly.
And thus, the Prusa i3 Mk3s kit was purchased:
https://www.prusa3d.com/product/original-prusa-i3-mk3s-kit-3/
It'll be a few weeks before this arrives, but I'll livestream its assembly on our main channel when it does. I'll also see what I can do with this other mess in the meantime.
If you would like to contribute to help us continue doing things like this, it would be much appreciated!
Your support is much appreciated, but please only do so if it's in your budget and you're comfortable

- The power went stupid with 11 hours left to print... It was THIS close to being done and was going to look great

- There was no recovery option because OctoPrint doesn't support that
- Prusa can do this if using the SD card as the print source, but we weren't doing that
[*]Most of a spool of plastic in the bin
[*]After the failed print, I decided to change the nozzle because it was over 1000 hours in and I was starting to see some boogering/clogging
[*]Like a good 3D printer owner, I reviewed tutorials and documentation on how to do this
[*]My hotend has seen some use, so it was only when I got the old nozzle off that I realized the extra nozzles I have are too tall and don't have the right diameter (.4mm)
[*]Attempting to reattach the old nozzle revealed that the heating block has something loose in it somewhere further up the assembly.
I have to put the printer away until I can sit down and disassemble the hotend to figure out what's what. It's a mechanical issue I should be able to fix, it's just in a dirty old hotend that I don't have bandwidth to bank on messing with it forever only to find something unfixable (or anything else that would further delay the stuff I want to do with you all). I beat the shit out of this Prusa i3 Mk3 over the years, and she'll be resurrected eventually, just not today.
That's not the end of the project. We were budgeting for a new printer later in the year, but I guess we'll pull the trigger now so we can ascend to the DMC heavens and attain the Mark of McFly.
And thus, the Prusa i3 Mk3s kit was purchased:
https://www.prusa3d.com/product/original-prusa-i3-mk3s-kit-3/
It'll be a few weeks before this arrives, but I'll livestream its assembly on our main channel when it does. I'll also see what I can do with this other mess in the meantime.
If you would like to contribute to help us continue doing things like this, it would be much appreciated!
Your support is much appreciated, but please only do so if it's in your budget and you're comfortable


LOL not willingly. I ain't giving up though. I'm stuck in here until I die.Wow, you bought a new one!
Honestly, it's not too bad. It's no simple, but it's definitely enjoyable for people who like doing this kind of thing. I build the Mk3 years ago, but as a first-timer it probably took a 3 days doing it for a while in the evenings. This one is the upgraded model from the Mk3 (the Mk3S) with a better probe and improvements to little things. Too bad the DeLorean has to take a rest though.Is it hard to assemble?
Setting up a livestream of our turtle in the meantime
 You're welcome.
Last edited by a moderator:
Similar threads
- Replies
- 0
- Views
- 903
- Replies
- 1
- Views
- 822

